Photos for Teaching and Learning
How I will use photos for teaching
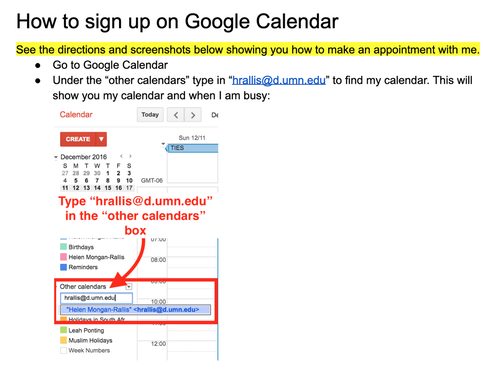
Guidelines on how to sign up to meet with someone on Google calendar
- This is a How-To guide to show students to sign up on my Google Calendar. I made this using a Google doc. On the doc I described each step and provide an annotated screenshot to illustrate what to do as part of each step.
- As a teacher I would provide a link to these guidelines to my advisees so that they could follow them if they needed to set up an appointment with me outside of my regular office hours.
- See my guidelines at: How to sign up for an appointment with me on Google Calendar).
- Below is a screenshot of part of the guidelines to show what they look like:
About me Photo Collage
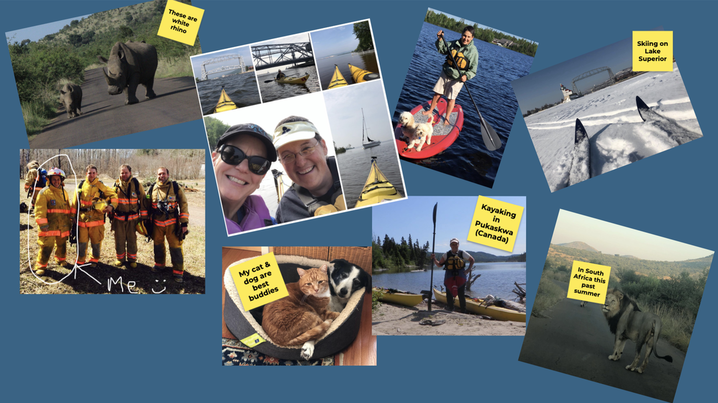
- I might make a collage of photos of me doing things that I enjoy and of aspects of my life to introduce myself to my students. I would then have them create their own "About me" collage to introduce themselves to me and to their classmates.
- I made my collage using Google Jamboard. I uploaded a selection of photos to my Google Drive, and then, using the Jamboard tools, added these to the page, along with sticky notes annotating some of the images.
- See my About Me Jamboard Collage.
- Below is a screenshot of the collage:
Another example: A Virtual Field trip:
[You can also see an example of a virtual field trip of UMD created using Google Slides by former Educ 2000 students Becca, Natalie, and Kaija (shared with their permission)]
[You can also see an example of a virtual field trip of UMD created using Google Slides by former Educ 2000 students Becca, Natalie, and Kaija (shared with their permission)]
- This is a virtual field trip of the UMD campus that I created using the online tool called ThingLink.
- First I took a photo of the campus (using a drone). Then I created what are called "hot spots" and used these to provide information about 3 different buildings on the UMD campus. For one of these, Kirby Center, housing the Multicultural Center, I made a hotspot describing the Multicultural Center and then I provided a link to Center website. For the other 2 hotspots I made a link to existing YouTube videos about these buildings (I did not make the videos myself).
- I would use a virtual field trip like this to show students how to find parts of campus. I might also take a photo of our classroom and use hotspots on a ThingLink to show students the parts of our room, where they will find supplies, where to submit work, and so on.
- Below I have embedded my ThingLink virtual field trip:

How I will have my students use photos for learning
Description of project
Project name: Geometric shapes.
Objective: Identify and show 3 different geometric shapes that are found in our surroundings.
Directions: (see the actual handout provided to students on Geometric shapes in our classroom
Now that you have learned about different geometric shapes, it’s time for you to show what you know! Using your iPad, take a photo of the 3 different kinds of shapes that you learned about in class this week. Here are the steps:
Show and label a square shape:
Show and label a rectangular shape:
Show and label a circular shape:
How I might use this type of example in teaching my students
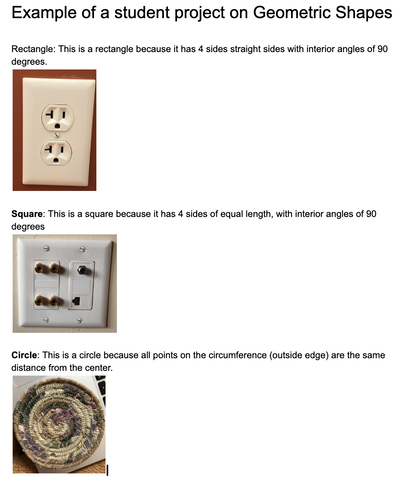
This project could be used after students have learned about geometric shapes (squares, rectangles, and circles). I would have them use the iPad cameras to find examples of each of these shapes in the classroom or at home. Then I would have them insert their images onto a Google Doc, explaining below each what shape this is and what the characteristics are of the shape.
Below is a screenshot of a student response to the Geometric shapes project).
Project name: Geometric shapes.
Objective: Identify and show 3 different geometric shapes that are found in our surroundings.
Directions: (see the actual handout provided to students on Geometric shapes in our classroom
Now that you have learned about different geometric shapes, it’s time for you to show what you know! Using your iPad, take a photo of the 3 different kinds of shapes that you learned about in class this week. Here are the steps:
Show and label a square shape:
- Take a photograph of an object in our classroom or in your home that is square shaped.
- Insert your photo of your square-shaped object into a Google doc. Below this, describe what makes this a square.
Show and label a rectangular shape:
- Take a photograph of an object in our classroom or in your home that is rectangular shaped.
- Insert your photo of your rectangular object into a Google doc. Below this, describe what makes this a rectangle.
Show and label a circular shape:
- Take a photograph of an object in our classroom or in your home that is circular shaped.
- Insert your photo of your circular object into a Google doc. Below this, describe what makes this a circle.
How I might use this type of example in teaching my students
This project could be used after students have learned about geometric shapes (squares, rectangles, and circles). I would have them use the iPad cameras to find examples of each of these shapes in the classroom or at home. Then I would have them insert their images onto a Google Doc, explaining below each what shape this is and what the characteristics are of the shape.
Below is a screenshot of a student response to the Geometric shapes project).

This work is licensed under a Creative Commons Attribution-NonCommercial-ShareAlike 4.0 International License.
